30 April 2013

Washi-taped Pencils

Do you remember that line in the movie "You've Got Mail" that goes:

"Don't you love New York in the fall? It makes me wanna buy school supplies. I would send you a bouquet of newly sharpened pencils if I knew your name and address. On the other hand, this not knowing has its charms..."

"...a bouquet of newly sharpened pencils."  That line stuck with me because I so get it!  I'd love and appreciate a bouquet of newly sharpened pencils!  LOL!  But really!!!  Wouldn't you?!?

I remembered that line while doing this washi-tape project and had to include a photo of my sharpened colored pencils!  What a happy sight! 

I got these pencils as Christmas gifts and thought of that "You've Got Mail" line, too!  I painted this mug in this shop called "Color Me Mine" which closed shortly after my sisters treated me to my bridal shower there.  Too bad it closed down.

I thought I'd do another fun washi-tape project (the first was the Homemade Bag Tags) while fixing my stuff.  Washi-taping my plain pencils seemed like a fun idea!  If you have washi tape and pencils, I suggest you go for it!  Do it as a breather in between stressful meetings at work or as a five-minute crafty project!  I'm serious.  It's all it takes...Five minutes to washi-tape a pencil!

Here are the results!
Plain pencils (which I love just as they are, actually) to...

Washi-taped pencils!!! <3...  I sharpened one (rightmost) to see what happens to the washi tape.  It crinkles a wee bit at the tip.  I suggest you use a manual sharpener to preserve the washi tape or the mechanical sharpener's teeth will leave marks on the pencil.

You can washi-tape yellow pencils too!
Yellow pencil washi-taped halfway!  Love it already!  I did this with my blue, space-themed washi tape!
Yellow pencils washi-taped all the way!  Cutie!
Try this project!  I'm telling you, it can be quite therapeutic!  And you may end up with your own bouquet of washi-taped pencils. ; )


29 April 2013

Homemade Montessori - "Felt" Sandpaper Numbers

<a href="http://www.bloglovin.com/blog/7268021/?claim=7pf6t345u5q"></a>


My daughter has this new-found interest in writing letters and numbers.  Months ago, she would resist writing exercises and would only practice when she is in a good mood.

Lately, she has been writing during her spare time.  She would ask for a pencil and paper and keep at writing for a considerable amount of time.  More often than writing letters, she would choose to write numbers.

She writes with such concentration and enthusiasm, only pausing to ask "Mommy, what's next?" from time to time.  Otherwise, she tries to figure out what number comes next in the sequence by counting again from one.

I am so impressed by this development and I just watch her write and acknowledge her hard work and effort when she is done. 

I noticed though that she has been writing some numbers backwards so I thought it might be helpful to go back to the basics to practice her strokes.

She was so proud of this work!  She encircled each number and said, "Look, mommy!" with a huge smile on her face!
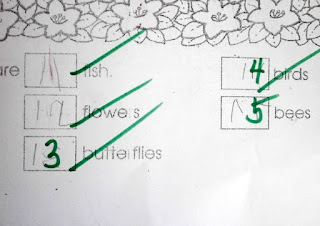
Sample work of exercises from summer class at her new school.

She worked with the Montessori sandpaper numbers in her previous school.  I love that it is a tactile learning tool to help children recognize and write numbers.  I have been wanting to  make a homemade version of the sandpaper numbers (and letters) but have been putting it off since I could not find the finer-grained sandpaper in hardware stores.  I figured maybe felt would be a good alternative so I tried it out.

To make the numbers, I cut them out of green felt and glue-gunned them unto old desk calendars.  I folded the desk calendars and glued the folded sides together to make the backing board of the numbers sturdy (a friend of mine used old DVD cases.  I love that she reused and re-purposed old DVD cases and that it makes for very durable backing board for sandpaper numbers).

This is what it looks like from the side.  They sort of open up near the folds but they are not bothersome to work with.

I recommend this Montessori material especially for children who are ready to learn their numbers.  The site Infomontessori or Montessori Primary Guide and this video will show you how to use this as an effective teaching tool.

These are all the numbers, top view!  May this project inspire you to make your own!


26 April 2013

Tokyu Hands and other Tokyo Craft Finds


The family recently went on a trip to Tokyo but my doc ordered that I continue my bed rest so I was unable to go.

Before the official bed rest request of my doc, I was dreaming of visiting Japanese craft stores.  I had heard of stories of endless floors of craft supplies from friends who have visited Tokyo and pictured rows and rows of pens, washi tape, super glue and paper.  I remembered watching David Celdran's show "Executive Class" years ago and could not forget his visit to this store filled with exquisite papers.  I researched online and found a blog that featured Ito-ya and Tokyu Hands (sorry, I can't seem to find that Tokyu Hands blog post)...and drooled.  Hahaha!  But as fate would have it, it wasn't my time to go craft-crazy in Japan yet.

So my dear hubby and little girl went with the rest of the family.  The super news is that the whole family enjoyed, had family bonding and had loads of stories to tell!

To cheer me up, they had a whole bunch of craft presents as treats for me!  It was as though I visited the craft stores myself!  Even better (in a way), since I didn't have to rack my brains figuring out which ones to get and which to leave behind plus I'm really thrifty (as those who know me would attest) and can resist the urge to splurge ( even with my favorite things) so I would not have gone home with these many, little treasures if I shopped for myself.

Here are the items the family brought home for me ( Thank you!  Thank you!  Most are from dear hubby.  He even saved the Tokyu Hands paper bag in case I wanted to blog/write about it. Really thoughtful of him.  Plus, he only bought one item for himself during this whole trip. :')  Touching but guilt-inducing at the same time). I have to admit I haven't brought myself to opening most of the items yet.  I'm still savoring the crispness of each one in their little packaging (Yes, nerd alert!).  

Most of these are from Tokyu Hands located in the Ikebukuro district of Tokyo (except for some items which I will indicate below).  

Frixion Ball Knock by Pilot Pen Corp. These pens are erasable.  The ink erases easily from the paper.  Really cool.  I had one of these in black but never saw the whole set available here.

Frixion Colors by Pilot Pen Corp. These are erasable markers.  Love all 12 colors.

Tombow Dual Tip Polymacoat markers.  Broad tip works like a highlighter.  Fine tip works like a tech/sign pen.

Post-it Ice Cream Notes (L) and Sakura stickers (R).

Small note cards with envelopes and stickers <3

Little note paper that can be used as gift tags.  Really cute as flowers pop-up when they are rolled or folded.


Origami Paper

Origami Paper with cute mushroom print.

Origami Paper with gold splattering.

Origami Paper in navy blue and gold.

Cutesy, mini notebook.

Washi Tape <3 <3 <3
Tombow Dual Tip Glue.  This is my favorite glue.  Acid-free, super adhesive and dries fast.  It doesn't make the paper buckle because with just a tiny amount, paper glues on right away.  The two on the left were the purchases from Tokyu Hands.  On right, are the ones I currently use.
And the star of the show is this staple-less stapler!  I discovered this through a friend and was amused and amazed at its ingenuity!  Here are some photos to illustrate its genius.

Staples a maximum of eight (8) papers at a time without the staple wire.


It punches a hole through the papers...

...and inserts the punched paper through the slit at the top to hold the paper together!  Such genius!

A-mazing!!!

Here are the photos of the Tokyu Hands floor guide (for more on the floor guide, you may check out this link) and the store bags. 


Here are the items which dear hubby found before visiting Tokyu Hands.  He can't remember the name of this particular store anymore. 

Circle Napkin Set - I know I should've included this in my "Table Napkins as Gift Wrappers" post but I hadn't opened them yet so I thought otherwise.  Heehee!

The label reads "Code Belt" but I think they really meant to put "Cord belt."  Haha!  These are for those lengthy electrical cords lying around the house.

Decor Sticker Tape from the Disney Store.
 

That's it!  So if Tokyo is your next travel destination and you are a craft-fanatic like me, I hope this gives you a glimpse of what crafts supplies to find during your visit.  I am pretty sure there are many, many more craft treasure troves all around the city.  Happy Tokyo craft-hunting!

25 April 2013

How to Make Fabric Rosettes


I made these fabric rosettes for my daughter's dresses about two years ago.   These dresses are too small for her now but are very dear to me.  A family friend of ours gave them to me out of the blue during a weekday mass.   She said she had bought them but found they would not fit any of her grandchildren so she thought of giving them away. Really, really sweet of her to have thought of me.  

I liked the dainty prints of the fabric and imagined that they would even look nicer with little fabric rosettes strewn near the neckline.

A friend of mine taught me this super easy way of making rosettes with fabric ribbon (a long, long time ago!) but for the rosettes on these dresses, I still scoured the web for other ways of making fabric flowers.  None of them made sense!  Hahaha!  Actually, they made sense, but they seemed complicated; none were as easy as how I know how to make them (whoever taught me how to make rosettes, thank you from the bottom of my heart!).

So this is how I make rosettes.  Quite shabby compared to the rosettes of OC tutorials I've seen online, but they turn out looking like rosettes so it's the way to go for me!  I'm hoping this tutorial saves you lots of time and that it's the easiest fabric rosette tutorial you find!  It's as easy as making crepe paper snakes ( we used to make these in school as easy classroom decor) and pulling one side of the ribbon so it gathers at the center.  Just look at the photo tutorial below and you'll understand what I mean.

For this tutorial, I used 24 inches of fabric ribbonNote that the size of your rosette will depend on the length and width of your ribbon so I encourage you to experiment with different ribbon lengths and widths to achieve the rosette size that you desire.

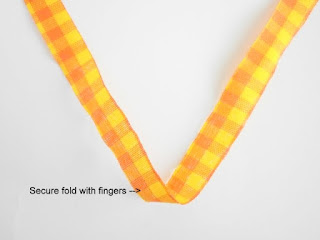
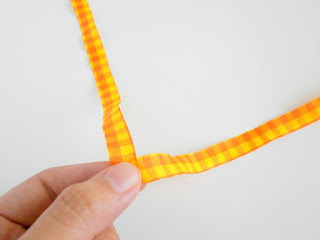
First, fold the 24-inch ribbon midway.


Really easy, isn't it?  

You can now sew it onto a plain white top to add some color to it.


Or make your own rosette clip.

My pretty niece modelling the rosette clip! = )

 
Here are some of my rosette projects.


Halloween 2011.  Angelina Ballerina homemade costume (more on homemade costumes in an upcoming post!).  Pink rosette on skirt.  I used a wide ribbon for this (maybe a 2" wide ribbon).

January 2012.  Wedding ring pillow with rosettes for my sis and bro-in-law's wedding.  I'm glad they entrusted such a task to me for their special day!  So relieved that they were satisfied with the result.  I used varied shades of silver and varied widths of ribbon for this project.  In photos are my handsome nephews! ; )

I hope this inspires you to make your own rosette projects.  It's as easy as pie!  =)