Showing posts with label crafts. Show all posts

24 May 2013

Painting Tissue Roll Owls


The hoarder in me started collecting tissue paper rolls months back for crafts with the little ones or a DIY project for the home.  It wasn't till today that painting them tickled our fancy!

I saw these cute tissue roll owls on pinterest  and thought it best to get messy and paint the tissue rolls instead (I later found out that one of the little ones had already done something similar during summer school!  Oh well! :)).

So what started out looking like this:


...was transformed into this for some crayon-resist art.


My daughter wanted to prepare some herself too for the cousins.


Then we moved outdoors for some messy painting fun!

These are some "BEFORE" shots.

I only put primary paint colors so they practice making secondary colors in the process.  I love it when they say, "Look, I made green!" or "Look, I made purple!"


And some "AFTER" shots.


!!!

 Some action shots while they were hard at work.


Quite fun so I painted some tissue roll owls myself!

Here are some of our tissue roll owls ( I think we painted nine it total).
I painted the first two.  Didn't the little ones do a better job?!


This is another easy peasy, fun craft activity that every kid (and kid-at-heart) will enjoy!

Try it yourself! = )


11 May 2013

Save a Tissue Roll, Save the World


If you watched the now defunct TV series "Heroes," you'd know where the quirky blog post title came from!

I'm all for reducing, reusing, recycling and upcycling so this was one project I couldn't wait to get my hands on!  

Dear hubby left these giant tissue rolls for me one morning (he brought them home from the office) and I spotted them sitting on the desk.  I instantly knew they were for me!  I was giddy excited and smiled from ear to ear!  Such DIY project potential in these tissue rolls (Yes, I may be the only wife who gets strangely excited when her husband surprises her with tissue rolls).  Well, they really had me at "hello."  This meant another DIY project/challenge for me! 
Since these are gigantic tissue rolls, they aren't the flimsy kinds.  They're thicker and sturdier.  One look at it and I knew they were perfect for corralling items; perfect as pencil or pen holders.  All I needed to do was decorate it and glue a firm base to hold whatever items I decide to place in them.

So first, I washi-taped the first roll.  I'm a fan of all things chevron-print now (see pinterest board on Lovin' Chevron!)...but honestly, I think it turned out less than perfect.  Something about the gaps in the washi didn't do it for me (I think for chevron-print to work, there should be equal stripe widths).  It took me more than an hour to painstakingly achieve chevron but ummm, I'm not exactly satisfied with the result.  Could have been better.

I was happier about the design of my second tissue roll.  I wrapped it in Ellen Krans scrapbooking paper (from a set given to me by my sister from her US trip).  It's a school-themed print which I love since it's so me!  And it only took about five short minutes to do!  Now, that's my kind of DIY project!

What do you think?!

Next, I used the tissue rolls to trace circles on foam sheets to use as the base and cut them up. 


Then, I adhered them to the bottom of the tissue rolls with a glue gun.


Tada!  Tissue rolls with a foam base!

And the finished product - giant tissue rolls turned cutesy pencil holders.
That's it.  Easy peasy DIY project.

I wouldn't mind doing more of these in the future.  Maybe try to achieve a better chevron-printed one.

I enjoin you to do the same if you can get a hold of giant tissue rolls!  Let's save the world one giant tissue roll at a time! = )


09 May 2013

Additional Note Card Craft Kits in my Etsy Shop

I was inspired to make these additional Note Card Craft Kits to post in my Etsy Shop.  The shop just feels so empty so it's great that I'm slowly able to fill it with new items.


Here's what I wrote to describe these crafts kits:

This paperminty Note Card Craft Kit with these dainty Laura Ashley scrapbooking papers is a fun gift as a Mother's Day present or a gift for a friend or loved one!

It could be a gift for yourself, too!

This Craft Kit includes:
15 folded, blank notecards in card stock (4"x5" each)
15 plain envelopes (size 5.5")
10 printed Laura Ashley scrapbooking papers (3.5"x4.5" each), acid and lignin free
5 plain scrapbooking papers (3.5"x4.5" each)
20 small handmade flower cutouts
20 big handmade flower cutouts

Contents are tied together with pretty, gold string and enclosed in a transparent acetate box.

With this Note Card Craft Kit, you can create and design your own note cards! There are endless design possibilities.

It comes with a promise of endless hours of crafting fun!

Convo me or email me through joydb_2013@yahoo.com.ph
for additional information.

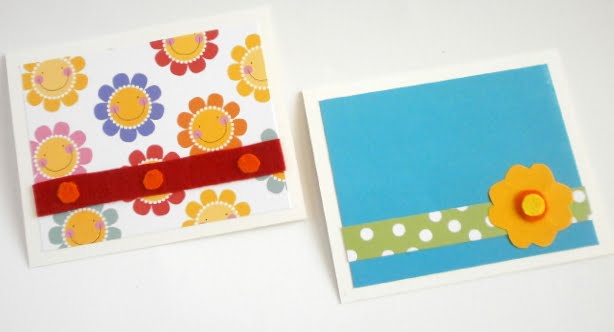
Here are two designs you can make with this craft kit:

The papers are actually pretty enough as they are so simple details will be enough.  For the card on the left, I just added a stripy strip of paper at the bottom and voila, a pretty card!


08 May 2013

New Item in my Etsy Shop - Note Card Craft Kit

Mother's Day is coming up and what better way to celebrate it by honoring your Mom or momma friend or loved one with a fun and crafty present - a Note Card Craft Kit!


It's been a while since I've added anything to my paperminties Etsy Shop and I figured this is the best time to do some shop-keeping since I have the time!

Each Note Card Craft Kit is only P350.00 for a whole set which includes:
15 folded, blank notecards (4"x5" each)
15 plain envelopes (size 5.5)
3 felt sheets
5 printed scrapbooking papers (3.5"x4.5" each)
5 plain scrapbooking papers (3.5"x4.5" each)
20 flower cutouts

Your momma or momma friend will surely have hours of crafting fun trying to create and design her own unique note cards!  There are endless possibilites!  Here are two of many, many possible designs:


As of this writing, only two (2) sets are available so hurry and purchase one now!


Please visit my Etsy shop to see what other paperminties are available!

You can also email me through joydb_2013@yahoo.com.ph for orders or inquiries.

30 April 2013

Washi-taped Pencils

Do you remember that line in the movie "You've Got Mail" that goes:

"Don't you love New York in the fall? It makes me wanna buy school supplies. I would send you a bouquet of newly sharpened pencils if I knew your name and address. On the other hand, this not knowing has its charms..."

"...a bouquet of newly sharpened pencils."  That line stuck with me because I so get it!  I'd love and appreciate a bouquet of newly sharpened pencils!  LOL!  But really!!!  Wouldn't you?!?

I remembered that line while doing this washi-tape project and had to include a photo of my sharpened colored pencils!  What a happy sight! 

I got these pencils as Christmas gifts and thought of that "You've Got Mail" line, too!  I painted this mug in this shop called "Color Me Mine" which closed shortly after my sisters treated me to my bridal shower there.  Too bad it closed down.

I thought I'd do another fun washi-tape project (the first was the Homemade Bag Tags) while fixing my stuff.  Washi-taping my plain pencils seemed like a fun idea!  If you have washi tape and pencils, I suggest you go for it!  Do it as a breather in between stressful meetings at work or as a five-minute crafty project!  I'm serious.  It's all it takes...Five minutes to washi-tape a pencil!

Here are the results!
Plain pencils (which I love just as they are, actually) to...

Washi-taped pencils!!! <3...  I sharpened one (rightmost) to see what happens to the washi tape.  It crinkles a wee bit at the tip.  I suggest you use a manual sharpener to preserve the washi tape or the mechanical sharpener's teeth will leave marks on the pencil.

You can washi-tape yellow pencils too!
Yellow pencil washi-taped halfway!  Love it already!  I did this with my blue, space-themed washi tape!
Yellow pencils washi-taped all the way!  Cutie!
Try this project!  I'm telling you, it can be quite therapeutic!  And you may end up with your own bouquet of washi-taped pencils. ; )


29 April 2013

Homemade Montessori - "Felt" Sandpaper Numbers

<a href="http://www.bloglovin.com/blog/7268021/?claim=7pf6t345u5q"></a>


My daughter has this new-found interest in writing letters and numbers.  Months ago, she would resist writing exercises and would only practice when she is in a good mood.

Lately, she has been writing during her spare time.  She would ask for a pencil and paper and keep at writing for a considerable amount of time.  More often than writing letters, she would choose to write numbers.

She writes with such concentration and enthusiasm, only pausing to ask "Mommy, what's next?" from time to time.  Otherwise, she tries to figure out what number comes next in the sequence by counting again from one.

I am so impressed by this development and I just watch her write and acknowledge her hard work and effort when she is done. 

I noticed though that she has been writing some numbers backwards so I thought it might be helpful to go back to the basics to practice her strokes.

She was so proud of this work!  She encircled each number and said, "Look, mommy!" with a huge smile on her face!
Sample work of exercises from summer class at her new school.

She worked with the Montessori sandpaper numbers in her previous school.  I love that it is a tactile learning tool to help children recognize and write numbers.  I have been wanting to  make a homemade version of the sandpaper numbers (and letters) but have been putting it off since I could not find the finer-grained sandpaper in hardware stores.  I figured maybe felt would be a good alternative so I tried it out.

To make the numbers, I cut them out of green felt and glue-gunned them unto old desk calendars.  I folded the desk calendars and glued the folded sides together to make the backing board of the numbers sturdy (a friend of mine used old DVD cases.  I love that she reused and re-purposed old DVD cases and that it makes for very durable backing board for sandpaper numbers).

This is what it looks like from the side.  They sort of open up near the folds but they are not bothersome to work with.

I recommend this Montessori material especially for children who are ready to learn their numbers.  The site Infomontessori or Montessori Primary Guide and this video will show you how to use this as an effective teaching tool.

These are all the numbers, top view!  May this project inspire you to make your own!


25 April 2013

How to Make Fabric Rosettes


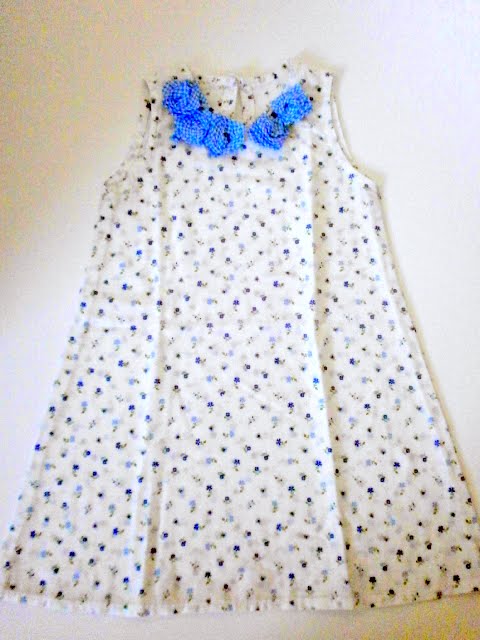
I made these fabric rosettes for my daughter's dresses about two years ago.   These dresses are too small for her now but are very dear to me.  A family friend of ours gave them to me out of the blue during a weekday mass.   She said she had bought them but found they would not fit any of her grandchildren so she thought of giving them away. Really, really sweet of her to have thought of me.  

I liked the dainty prints of the fabric and imagined that they would even look nicer with little fabric rosettes strewn near the neckline.

A friend of mine taught me this super easy way of making rosettes with fabric ribbon (a long, long time ago!) but for the rosettes on these dresses, I still scoured the web for other ways of making fabric flowers.  None of them made sense!  Hahaha!  Actually, they made sense, but they seemed complicated; none were as easy as how I know how to make them (whoever taught me how to make rosettes, thank you from the bottom of my heart!).

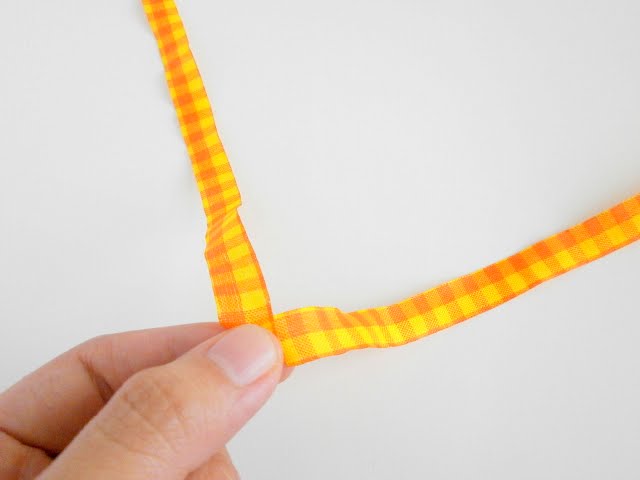
So this is how I make rosettes.  Quite shabby compared to the rosettes of OC tutorials I've seen online, but they turn out looking like rosettes so it's the way to go for me!  I'm hoping this tutorial saves you lots of time and that it's the easiest fabric rosette tutorial you find!  It's as easy as making crepe paper snakes ( we used to make these in school as easy classroom decor) and pulling one side of the ribbon so it gathers at the center.  Just look at the photo tutorial below and you'll understand what I mean.

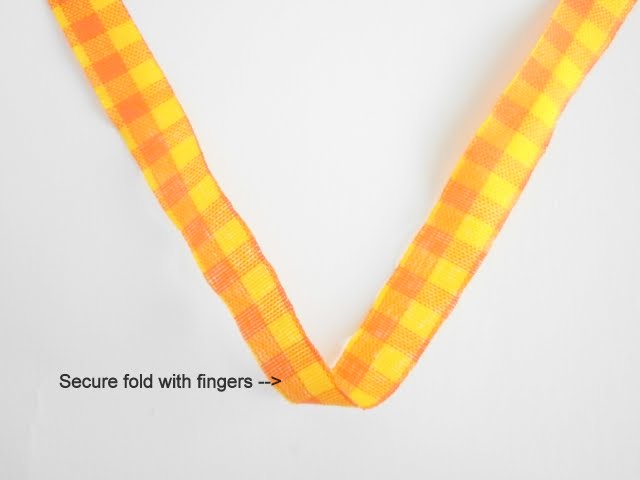
For this tutorial, I used 24 inches of fabric ribbon.  Note that the size of your rosette will depend on the length and width of your ribbon so I encourage you to experiment with different ribbon lengths and widths to achieve the rosette size that you desire.

First, fold the 24-inch ribbon midway.


Really easy, isn't it?  

You can now sew it onto a plain white top to add some color to it.


Or make your own rosette clip.

My pretty niece modelling the rosette clip! = )

 
Here are some of my rosette projects.


Halloween 2011.  Angelina Ballerina homemade costume (more on homemade costumes in an upcoming post!).  Pink rosette on skirt.  I used a wide ribbon for this (maybe a 2" wide ribbon).

January 2012.  Wedding ring pillow with rosettes for my sis and bro-in-law's wedding.  I'm glad they entrusted such a task to me for their special day!  So relieved that they were satisfied with the result.  I used varied shades of silver and varied widths of ribbon for this project.  In photos are my handsome nephews! ; )

I hope this inspires you to make your own rosette projects.  It's as easy as pie!  =)