Showing posts with label handmade. Show all posts

23 October 2016

DIY Dollhouse

My husband has to be commended for building this spiffy dollhouse made out of the scrap wood that was just lying around.  The painting and finishing was done by our trusty carpenter.  My eldest and I couldn't wait to put wallpaper on it so we picked out the prints way before it was done.  This is a before and after shot:
Looks a lot better than the dreary plain old white house.


I promised myself I wouldn't buy little furniture for this new project.  We have a multi-colored wooden dollhouse with furniture but I had Scandinavian dreams for this one, so I didn't want to touch that other set.  I was super inspired by this blog post Modern DIY Dollhouse Furniture by Landsdowne Life that DIY furniture was the way to go.  So my daughter and I started collecting knick knacks/lose parts.  My obsession was waiting for the dental floss and hair conditioner to run out because I needed them for the dollhouse.  This was the first batch of furniture (pre-floss and conditioner cap):

I say not bad for starters.  Looking good for a few pieces here and there.
So the first batch of furniture was a hit!  My three kids were engrossed in play, and it was a joy to watch since I made the interiors myself and I didn't spend anything on the cutesy modern furniture!  Here are the recent photos.  Notice the Hermes artwork in the bathroom wall!  That's from a Hermes catalog family gave to me from a trip to Japan!


For a closer look at the little parts that make the interiors:


iPhone box bed.  Vietnamese pouch for the matress.  Silver perfume cover for the nightstand.  Acrylic cover from a little container.

The piece de resistance: the water closet!!!  Dental floss and hair conditioner cover!  I love it to bits!  Do you spot the other features?!  The mirror was extracted from a pink Barbie mirror for kids!

I can't wait to see what you can come up with!  Please shoot me a message so I can see your modern DIY dollhouse furniture!

28 February 2014

Backlog Posts Teaser!!!

Just like that, six months passed.  Life happened, literally, as we welcomed Baby #2 in August (plus I went back to teaching at a new school).

The blog took a backseat and party paperminties posts were shelved.

With the recent party paperminties inquiries, the nagging urge to post the paperminties-decorated parties surfaced.

Please watch out for the delayed posts as we will post them soon!


Teaser photos of what's in store.

Halloween in August.

Shabby Chic Tea Party.

Poopoo Party (yep, you read that right!).


04 July 2013

Party Paperminties - "The Very Hungry Caterpillar"


When I was told of the next party paperminties theme "The Very Hungry Caterpillar," I was thrilled and excited!  I am an Eric Carle fan.  Each of his illustrations is really a work of art. When I look through his books, I imagine how he designed each masterpiece and tediously painted and handpicked the perfect paper to complete them.

Wanting to get some insight into his design process, I researched a bit and found this on his official website.  This is what he says about his artwork, "I begin with plain tissue paper and paint it with different colors, using acrylics. Sometimes I paint with a wide brush, sometimes with a narrow brush. Sometimes my strokes are straight, and sometimes they’re wavy. Sometimes I paint with my fingers. Or I paint on a piece of carpet, sponge, or burlap and then use that like a stamp on my tissue papers to create different textures."

For this party paperminties theme, I wanted to make each one as close to the original artwork as possible and thought of using tissue paper as well but since it's not going to hold up on a wall or a centerpiece stick, I decided to do my own cut-paper versions. 
“I begin with plain tissue paper and paint it with different colors, using acrylics. Sometimes I paint with a wide brush, sometimes with a narrow brush. Sometimes my strokes are straight, and sometimes they’re wavy. Sometimes I paint with my fingers. Or I paint on a piece of carpet, sponge, or burlap and then use that like a stamp on my tissue papers to create different textures.” - See more at: http://blog.sanfranciscomusicbox.com/how-eric-carle-makes-his-beautiful-art/#sthash.uFIjeCZU.dpuf

Well, Mr. Eric Carle,  I hope I do you proud! = )

Large Wall Decor

Large Wall Decor

Large Wall Decor

Large Wall Decor
Party Invite - paperminties' first party invite!  The circles are attached to each other with circle paper fasteners so the body retracts behind the head of the caterpillar.  I copied this from a school invite. ; )

Table confetti.

Table Centerpiece Stick

Table Centerpiece Stick

Table Centerpiece Stick
Table Centerpiece Sticks
Table Centerpiece Stick

Table Centerpiece Stick

Table Centerpiece Stick

Table Centerpiece Stick

Table Centerpiece Stick

Table Centerpiece Stick

Table Centerpiece Sticks

Table Centerpiece Sticks

Table Centerpiece Sticks (foreground).  Excess party invites were used as party decor (background)

Table Centerpiece Sticks

If you need paperminties to customize your next party with cut-paper party decor, just let us know by sending us a private message through our Facebook page - www.facebook.com/paperminties. ; )


29 May 2013

Homemade Montessori - Cards and Counters


This is one of the simpler Montessori DIYs I've made. I made this about a year ago.  Like the Felt Moveable Alphabet, this was to supplement my daughter's lessons at school.

When I first encountered this Montessori manipulative, I remembered how we were first taught 'numbers and counting' in the traditional school I attended back in the day - learning mostly from textbooks and hardly working on anything concrete or tangible (which would have made me learn faster and more effectively). I have since appreciated how this material is tactile, that it not only helps children recognize numbers, their sequencing and their corresponding quantities but it also introduces "odd" and "even" numbers.

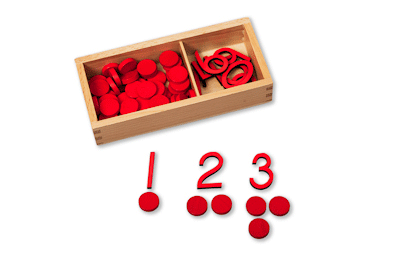
These are the Montessori numbers and counters we use at the preschool where I used to work.  Photo courtesy of absorbentminds.co.uk

I have been on the lookout for shops selling Montessori materials, keeping an eye out for the red 'numbers and counters,' but haven't encountered any so I decided to make my own.

These are the materials I sourced for this project:
1. Blank flash cards - a supermarket find.  You may also use index cards.
2. Green marker- to match the glass stones.
3. Green glass stones which have flat undersides - I found these in Divisoria.  (I saw some glass stones in SM but the undersides were not flat).  Other DIY moms have used bottle caps, acorns, pine cones and even Teddy Grahams!  So you can be creative! 
4. Plastic container for the glass stones.


I use the cards for practicing sequencing.

And the number cards and counters (glass stones) for learning corresponding number quantities.


For the cards, I just wrote the numbers on the cards and drew uneven circles to resemble the glass stones.


It is important to put the exact number of counters or in this case, glass stones for numbers 1 to 10 (55 pieces) to serve as a self-check or control of error.


At times, my daughter would rather count the glass stones without the cards which also makes for good counting practice so I don't mind.


Other times, the glass stones are used for "cooking" in the Homemade Toy Kitchen (along with beans and shells) or used as "treasure" so we are almost out on glass stones.  Haha!  Time to replenish.

If you want to learn more about using this material, this post is a step-by-step tutorial on how to best use it.  You may also check out  this post to see how Lisa Nolan, a Montessori mom, uses this material with her child.

20 May 2013

My First Handmade Stamps

I'm so happy!!!  I made my first homemade, handmade stamps!!!

The story behind these handmade stamps...

Last week, I made these notecards...


Pretty.  But I was already dreaming of having my own stamps made so I could use them on note cards and really call them my own.

Then I remembered that our friend Carla had mentioned that she made her own stamps.  Making my own stamps never occurred to me before. Out of curiosity, I researched online.  Thanks to pinterest and google, I found this blog post and this blog post.  The stamp-making video and eraser stamp tutorial were really helpful.  Both posts seemed easy to follow.  I got so excited and when I got the chance to go to the bookstore, I got myself the essential tools.

Today, I finally got to play with my new toys!  This is my first stamp:
A peppermint!  Peppermints are on my paperminties banners, if you hadn't noticed! ; )
 ...and it looked like this on paper.


My daughter watched me make my first stamp and she enjoyed trying it out as well.

Then, I got really excited and ended up making more.

They were really easy to make and quite addicting!  I'm glad I bought many erasers so I could make more.  I am seriously hooked.

I was not satisfied with the colors of the store-bought stamp pads so I followed the instructions on this post to make my own. 
Homemade Ink Pads

Now, I can make note cards with designs that really have my stamp on them.  Pun intended.

I will definitely post to show photos of the note cards when I've finally made some out of these handmade, homemade stamps!