Showing posts with label Homemade Montessori. Show all posts

29 May 2013

Homemade Montessori - Cards and Counters


This is one of the simpler Montessori DIYs I've made. I made this about a year ago.  Like the Felt Moveable Alphabet, this was to supplement my daughter's lessons at school.

When I first encountered this Montessori manipulative, I remembered how we were first taught 'numbers and counting' in the traditional school I attended back in the day - learning mostly from textbooks and hardly working on anything concrete or tangible (which would have made me learn faster and more effectively). I have since appreciated how this material is tactile, that it not only helps children recognize numbers, their sequencing and their corresponding quantities but it also introduces "odd" and "even" numbers.
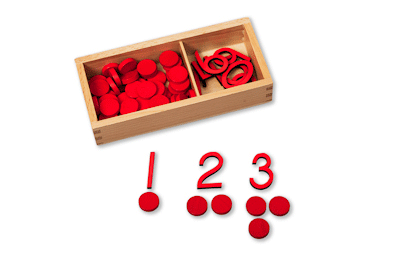
These are the Montessori numbers and counters we use at the preschool where I used to work.  Photo courtesy of absorbentminds.co.uk

I have been on the lookout for shops selling Montessori materials, keeping an eye out for the red 'numbers and counters,' but haven't encountered any so I decided to make my own.

These are the materials I sourced for this project:
1. Blank flash cards - a supermarket find.  You may also use index cards.
2. Green marker- to match the glass stones.
3. Green glass stones which have flat undersides - I found these in Divisoria.  (I saw some glass stones in SM but the undersides were not flat).  Other DIY moms have used bottle caps, acorns, pine cones and even Teddy Grahams!  So you can be creative! 
4. Plastic container for the glass stones.


I use the cards for practicing sequencing.

And the number cards and counters (glass stones) for learning corresponding number quantities.


For the cards, I just wrote the numbers on the cards and drew uneven circles to resemble the glass stones.


It is important to put the exact number of counters or in this case, glass stones for numbers 1 to 10 (55 pieces) to serve as a self-check or control of error.


At times, my daughter would rather count the glass stones without the cards which also makes for good counting practice so I don't mind.


Other times, the glass stones are used for "cooking" in the Homemade Toy Kitchen (along with beans and shells) or used as "treasure" so we are almost out on glass stones.  Haha!  Time to replenish.

If you want to learn more about using this material, this post is a step-by-step tutorial on how to best use it.  You may also check out  this post to see how Lisa Nolan, a Montessori mom, uses this material with her child.

29 April 2013

Homemade Montessori - "Felt" Sandpaper Numbers

<a href="http://www.bloglovin.com/blog/7268021/?claim=7pf6t345u5q"></a>


My daughter has this new-found interest in writing letters and numbers.  Months ago, she would resist writing exercises and would only practice when she is in a good mood.

Lately, she has been writing during her spare time.  She would ask for a pencil and paper and keep at writing for a considerable amount of time.  More often than writing letters, she would choose to write numbers.

She writes with such concentration and enthusiasm, only pausing to ask "Mommy, what's next?" from time to time.  Otherwise, she tries to figure out what number comes next in the sequence by counting again from one.

I am so impressed by this development and I just watch her write and acknowledge her hard work and effort when she is done. 

I noticed though that she has been writing some numbers backwards so I thought it might be helpful to go back to the basics to practice her strokes.

She was so proud of this work!  She encircled each number and said, "Look, mommy!" with a huge smile on her face!
Sample work of exercises from summer class at her new school.

She worked with the Montessori sandpaper numbers in her previous school.  I love that it is a tactile learning tool to help children recognize and write numbers.  I have been wanting to  make a homemade version of the sandpaper numbers (and letters) but have been putting it off since I could not find the finer-grained sandpaper in hardware stores.  I figured maybe felt would be a good alternative so I tried it out.

To make the numbers, I cut them out of green felt and glue-gunned them unto old desk calendars.  I folded the desk calendars and glued the folded sides together to make the backing board of the numbers sturdy (a friend of mine used old DVD cases.  I love that she reused and re-purposed old DVD cases and that it makes for very durable backing board for sandpaper numbers).

This is what it looks like from the side.  They sort of open up near the folds but they are not bothersome to work with.

I recommend this Montessori material especially for children who are ready to learn their numbers.  The site Infomontessori or Montessori Primary Guide and this video will show you how to use this as an effective teaching tool.

These are all the numbers, top view!  May this project inspire you to make your own!


11 April 2013

Homemade Montessori - Felt Moveable Alphabet


I made my own version of the Montessori moveable alphabet about a month or two ago to supplement my daughter's lessons in school.  I love that this moveable alphabet prepares children for reading, writing and spelling, and that they can touch and feel the letters with their fingers as they sound out the letters.

The letters of the Montessori moveable alphabet that they use at school are wooden and come in two colors - red for consonants and blue for vowels.  At first, I was thinking of using board paper but changed my mind as I imagined creases or tears on the paper letters after each use. Foam boards would have been another option but I did not have enough in two colors so I used felt fabric instead.  I did not have blue or red felt on-hand so I decided to use the purple and pink felt I had in storage. 

I just guesstimated the sizes of the letters, trying my best to make them identical to the actual moveable alphabet she works with at school.  The short lowercase letters (a, c, e, i, m, n, o, r, s, u, v, w, x, z) came out to be 1.5" tall.  Widths varied as there are wider letters ( like m and w) but the others are mostly 1.5" wide.  The tall/long lowercase letters (b, d, f, g, h, j, k, l, p, q, t, y) turned out to be 2.5" tall with varying widths as well. 

I made five (5) of each vowel and four (4) of each consonant.

I tried looking for plastic containers with 26 compartments but only found the one in photo below. This was actually my second purchase.  The first one was even smaller.  This worked better than the first since the compartments were 2.5" in height so the tall letters fit snugly into each compartment.  I just improvised on the lack of width space, squeezing in more than two letters in snug spaces (like i, j and k or the letters in the last two compartments) - this is not very ideal though as the letters get mixed up when the container is not upright (still best to find a container with 26 or more compartments).


For the CVCs, I drew some simple, cartoony things and animals on 4"x6" blank index cards which look like these:

Watch this video from a month ago of our little one working on the moveable alphabet ( I love the part where she giggles, realizing she mixed up the letters).

Some pointers if you do decide to make your own moveable alphabet out of felt:
- You may print out enlarged letters in a font similar to those of the moveable alphabet (Montessori D'Nelian-type font) to serve as your guide in cutting the lowercase letters.  Berlin sans is one font option.
- You may also print pictures of CVCs from the web instead of drawing your own.
- Lowercase letters b, d and p are identical so you can use one stencil or guide for cutting out these three letters.
- Lowercase letters u and n are identical in shape as well but note that letter u is a vowel and n, a consonant, so use the same stencil or guide but use different colored felt.
- Use a container with compartments that have ample space for all the letters.  
- Glue gun one of each letter into its compartment to encourage packing away after each spelling activitiy.
- Sneak in the uppercase letter of the first letter of your child's name for spelling practice (I snuck in a big letter T for our little girl)!  
- MontessoriMom has a very helpful step-by-step guide on how to best use the moveable alphabet!  Do check it out!
- Have fun!