29 May 2013

Homemade Montessori - Cards and Counters


This is one of the simpler Montessori DIYs I've made. I made this about a year ago.  Like the Felt Moveable Alphabet, this was to supplement my daughter's lessons at school.

When I first encountered this Montessori manipulative, I remembered how we were first taught 'numbers and counting' in the traditional school I attended back in the day - learning mostly from textbooks and hardly working on anything concrete or tangible (which would have made me learn faster and more effectively). I have since appreciated how this material is tactile, that it not only helps children recognize numbers, their sequencing and their corresponding quantities but it also introduces "odd" and "even" numbers.
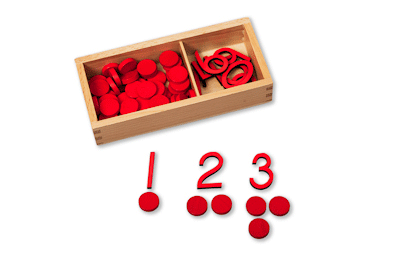
These are the Montessori numbers and counters we use at the preschool where I used to work.  Photo courtesy of absorbentminds.co.uk

I have been on the lookout for shops selling Montessori materials, keeping an eye out for the red 'numbers and counters,' but haven't encountered any so I decided to make my own.

These are the materials I sourced for this project:
1. Blank flash cards - a supermarket find.  You may also use index cards.
2. Green marker- to match the glass stones.
3. Green glass stones which have flat undersides - I found these in Divisoria.  (I saw some glass stones in SM but the undersides were not flat).  Other DIY moms have used bottle caps, acorns, pine cones and even Teddy Grahams!  So you can be creative! 
4. Plastic container for the glass stones.


I use the cards for practicing sequencing.

And the number cards and counters (glass stones) for learning corresponding number quantities.


For the cards, I just wrote the numbers on the cards and drew uneven circles to resemble the glass stones.


It is important to put the exact number of counters or in this case, glass stones for numbers 1 to 10 (55 pieces) to serve as a self-check or control of error.


At times, my daughter would rather count the glass stones without the cards which also makes for good counting practice so I don't mind.


Other times, the glass stones are used for "cooking" in the Homemade Toy Kitchen (along with beans and shells) or used as "treasure" so we are almost out on glass stones.  Haha!  Time to replenish.

If you want to learn more about using this material, this post is a step-by-step tutorial on how to best use it.  You may also check out  this post to see how Lisa Nolan, a Montessori mom, uses this material with her child.

24 May 2013

Painting Tissue Roll Owls


The hoarder in me started collecting tissue paper rolls months back for crafts with the little ones or a DIY project for the home.  It wasn't till today that painting them tickled our fancy!

I saw these cute tissue roll owls on pinterest  and thought it best to get messy and paint the tissue rolls instead (I later found out that one of the little ones had already done something similar during summer school!  Oh well! :)).

So what started out looking like this:


...was transformed into this for some crayon-resist art.


My daughter wanted to prepare some herself too for the cousins.


Then we moved outdoors for some messy painting fun!

These are some "BEFORE" shots.

I only put primary paint colors so they practice making secondary colors in the process.  I love it when they say, "Look, I made green!" or "Look, I made purple!"


And some "AFTER" shots.


!!!

 Some action shots while they were hard at work.


Quite fun so I painted some tissue roll owls myself!

Here are some of our tissue roll owls ( I think we painted nine it total).
I painted the first two.  Didn't the little ones do a better job?!


This is another easy peasy, fun craft activity that every kid (and kid-at-heart) will enjoy!

Try it yourself! = )


22 May 2013

Reusing an Old Tin


I stumbled upon this old watch case and didn't have the heart to throw it away.

It has a nice, foam center with a circular slot where the watch (that I lost) used to be.

Remembering how crayons roll off the table when my daughter colors and sketches, I decided to reuse this old, squarish tin as a crayon holder.

Now my daughter knows to return the crayons into this holder to prevent them from rolling off the table.

It's a nice, simple way of making life easier and more organized by reusing old household items.


What about you?  What's your "reuse," "recycle" story?

20 May 2013

My First Handmade Stamps

I'm so happy!!!  I made my first homemade, handmade stamps!!!

The story behind these handmade stamps...

Last week, I made these notecards...


Pretty.  But I was already dreaming of having my own stamps made so I could use them on note cards and really call them my own.

Then I remembered that our friend Carla had mentioned that she made her own stamps.  Making my own stamps never occurred to me before. Out of curiosity, I researched online.  Thanks to pinterest and google, I found this blog post and this blog post.  The stamp-making video and eraser stamp tutorial were really helpful.  Both posts seemed easy to follow.  I got so excited and when I got the chance to go to the bookstore, I got myself the essential tools.

Today, I finally got to play with my new toys!  This is my first stamp:
A peppermint!  Peppermints are on my paperminties banners, if you hadn't noticed! ; )
 ...and it looked like this on paper.


My daughter watched me make my first stamp and she enjoyed trying it out as well.

Then, I got really excited and ended up making more.

They were really easy to make and quite addicting!  I'm glad I bought many erasers so I could make more.  I am seriously hooked.

I was not satisfied with the colors of the store-bought stamp pads so I followed the instructions on this post to make my own. 
Homemade Ink Pads

Now, I can make note cards with designs that really have my stamp on them.  Pun intended.

I will definitely post to show photos of the note cards when I've finally made some out of these handmade, homemade stamps! 


11 May 2013

Save a Tissue Roll, Save the World


If you watched the now defunct TV series "Heroes," you'd know where the quirky blog post title came from!

I'm all for reducing, reusing, recycling and upcycling so this was one project I couldn't wait to get my hands on!  

Dear hubby left these giant tissue rolls for me one morning (he brought them home from the office) and I spotted them sitting on the desk.  I instantly knew they were for me!  I was giddy excited and smiled from ear to ear!  Such DIY project potential in these tissue rolls (Yes, I may be the only wife who gets strangely excited when her husband surprises her with tissue rolls).  Well, they really had me at "hello."  This meant another DIY project/challenge for me! 
Since these are gigantic tissue rolls, they aren't the flimsy kinds.  They're thicker and sturdier.  One look at it and I knew they were perfect for corralling items; perfect as pencil or pen holders.  All I needed to do was decorate it and glue a firm base to hold whatever items I decide to place in them.

So first, I washi-taped the first roll.  I'm a fan of all things chevron-print now (see pinterest board on Lovin' Chevron!)...but honestly, I think it turned out less than perfect.  Something about the gaps in the washi didn't do it for me (I think for chevron-print to work, there should be equal stripe widths).  It took me more than an hour to painstakingly achieve chevron but ummm, I'm not exactly satisfied with the result.  Could have been better.

I was happier about the design of my second tissue roll.  I wrapped it in Ellen Krans scrapbooking paper (from a set given to me by my sister from her US trip).  It's a school-themed print which I love since it's so me!  And it only took about five short minutes to do!  Now, that's my kind of DIY project!

What do you think?!

Next, I used the tissue rolls to trace circles on foam sheets to use as the base and cut them up. 


Then, I adhered them to the bottom of the tissue rolls with a glue gun.


Tada!  Tissue rolls with a foam base!

And the finished product - giant tissue rolls turned cutesy pencil holders.
That's it.  Easy peasy DIY project.

I wouldn't mind doing more of these in the future.  Maybe try to achieve a better chevron-printed one.

I enjoin you to do the same if you can get a hold of giant tissue rolls!  Let's save the world one giant tissue roll at a time! = )


09 May 2013

Additional Note Card Craft Kits in my Etsy Shop

I was inspired to make these additional Note Card Craft Kits to post in my Etsy Shop.  The shop just feels so empty so it's great that I'm slowly able to fill it with new items.


Here's what I wrote to describe these crafts kits:

This paperminty Note Card Craft Kit with these dainty Laura Ashley scrapbooking papers is a fun gift as a Mother's Day present or a gift for a friend or loved one!

It could be a gift for yourself, too!

This Craft Kit includes:
15 folded, blank notecards in card stock (4"x5" each)
15 plain envelopes (size 5.5")
10 printed Laura Ashley scrapbooking papers (3.5"x4.5" each), acid and lignin free
5 plain scrapbooking papers (3.5"x4.5" each)
20 small handmade flower cutouts
20 big handmade flower cutouts

Contents are tied together with pretty, gold string and enclosed in a transparent acetate box.

With this Note Card Craft Kit, you can create and design your own note cards! There are endless design possibilities.

It comes with a promise of endless hours of crafting fun!

Convo me or email me through joydb_2013@yahoo.com.ph
for additional information.

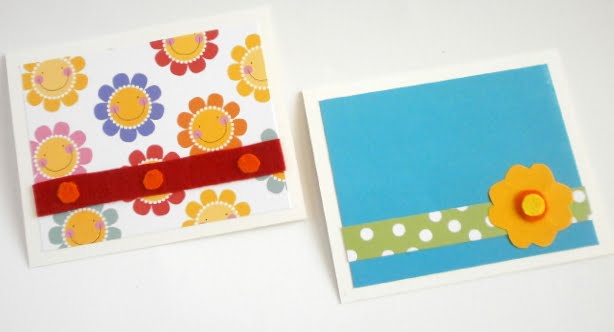
Here are two designs you can make with this craft kit:

The papers are actually pretty enough as they are so simple details will be enough.  For the card on the left, I just added a stripy strip of paper at the bottom and voila, a pretty card!


08 May 2013

New Item in my Etsy Shop - Note Card Craft Kit

Mother's Day is coming up and what better way to celebrate it by honoring your Mom or momma friend or loved one with a fun and crafty present - a Note Card Craft Kit!


It's been a while since I've added anything to my paperminties Etsy Shop and I figured this is the best time to do some shop-keeping since I have the time!

Each Note Card Craft Kit is only P350.00 for a whole set which includes:
15 folded, blank notecards (4"x5" each)
15 plain envelopes (size 5.5)
3 felt sheets
5 printed scrapbooking papers (3.5"x4.5" each)
5 plain scrapbooking papers (3.5"x4.5" each)
20 flower cutouts

Your momma or momma friend will surely have hours of crafting fun trying to create and design her own unique note cards!  There are endless possibilites!  Here are two of many, many possible designs:


As of this writing, only two (2) sets are available so hurry and purchase one now!


Please visit my Etsy shop to see what other paperminties are available!

You can also email me through joydb_2013@yahoo.com.ph for orders or inquiries.