24 March 2013

Happy Play Dough Day


My daughter loooves play dough.  Months back, I was inspired to make homemade play dough from a youtube tutorial (sorry, can’t remember which one anymore) and although it ended up as a sort of gooey mess, she loved playing with it – kneading, rolling, folding, forming it.  She was at it for a long time, beating my DIY attention span.  When she was done playing with it, we kept it in an airtight plastic container and to my surprise, it kept for months.  She would take it out more often than I thought she would and use it as “food” for her homemade toy kitchen.

Fast forward to days ago...I was sorting out her Play-Doh toys and realized that the canisters were out of (duh...what else but) play dough!  They had dried up because they were not returned properly into the airtight containers or they had been shredded to bits in the process of making “ice cream.”  So we were back on YouTube.  I found this YouTube tutorial by candidmommy with the following ingredients:

3 cups of flour
1 tbsp of cream of tartar
½ cup of salt
2 cups of water
4 tbsp oil
Food coloring

Read on before copying this recipe...

My little assistants and I followed the recipe to bits, save for the cream of tartar which we did not have on hand.  I read somewhere that cream of tartar was meant to add “body” to the dough and as an alternative, you can use lemon juice.  Since we did not have lemons either, I improvised with two tablespoons of juice from our local lemon, calamansi.   

The procedure was to mix the first three ingredients in a bowl.  Boil two cups of water with the oil.  Pour the hot water and oil mixture into the dry ingredients in the bowl.  Mix together.  Sounded easy.  


We did just that but for some odd reason, ended up with an ooey gooey mess, worse than the one we made months ago.  (This is the reason why we do not have a photo of it.  My hands were covered in goo so I did not dare touch the camera).  Even if it was ooey and gooey, I was too excited to play with the dough myself and quite in denial, I distributed the slimy goo among the girls!  Our hands were all white and slimy and icky but hey, we were giggling and having fun!

The fun did not stop there.  We got a pack of flour and added a little of it here and there.  We must have ended up using half a pack more.  It worked! 

(Note to self: next time, slowly add in the water and oil mixture with the dry ingredients and while mixing, check for the best consistency.  Practice makes perfect.)

Afterwards, we added the food coloring.  I had the three primary colors on hand – yellow, red and blue – and with them, we made six colors of play dough: yellow, red (which came out more pink than red), blue, green, purple and orange.  We also set aside a ball of dough and left it white to use as vanilla ice cream!

I was so happy because we had so much play dough!  The empty Play-Doh canisters could not contain it all so we got an airtight plastic container to keep it all in.

Also, adding the flour and replacing the cream of tartar with the calamansi juice worked.  

It was a happy play dough day!  The girls played for about three hours with the homemade play dough and Play-Doh Cake and Ice Cream Confections Set.  

This was the true test of consistency.  Piping frosting onto the "ice cream" was easy enough for little hands! ; )


Another test of consistency - no leftover gunk on cupcake maker.  Fabulous!


They made this all by themselves!  Yummy-looking ice cream and sundae!
Some things we achieved through play: following step-by-step directions (*Cough*  Well, somehow...), improvising, taking turns, sharing, developing hand muscle control and mixing primary colors to make secondary colors.  Priceless.

I’m Baaaaaaack!


Finally, I’m baaaack after a two-year blogging hiatus!  So many things happened in the course of two years; little DIYs here and there but no time to blog.  Now that I am on bed rest (aka medical house arrest), I will use all this time to blog and share the little DIY projects and crafty stuff I’ve acquired or made...and create some more, and be my happy, productive, DIY self.

Happy to serve you.  Welcome to my life. :)

02 August 2011

Father's Day Shirts

This sewing project was inspired by Made by Joel's Owl Shirts.  They are nowhere near how neat the Owl Shirts were made but they were fun doing anyhow!

These shirts were the gifts we gave for Father's Day to all the dads in our immediate family:

Crown - for my dad "Rey" whose name means "King."
Barbell - for my father-in-law who is a health enthusiast.
Mount Everest - for my mountaineer brother-in-law.
Darth Vader - for my brother-in-law who is into Star Wars.


Below are the photos of the gift-wrapped shirts!  I used corrugated paper boards to make them.  They looked pretty with the matching plaid ribbons.  I was pleased with the result.

03 June 2011

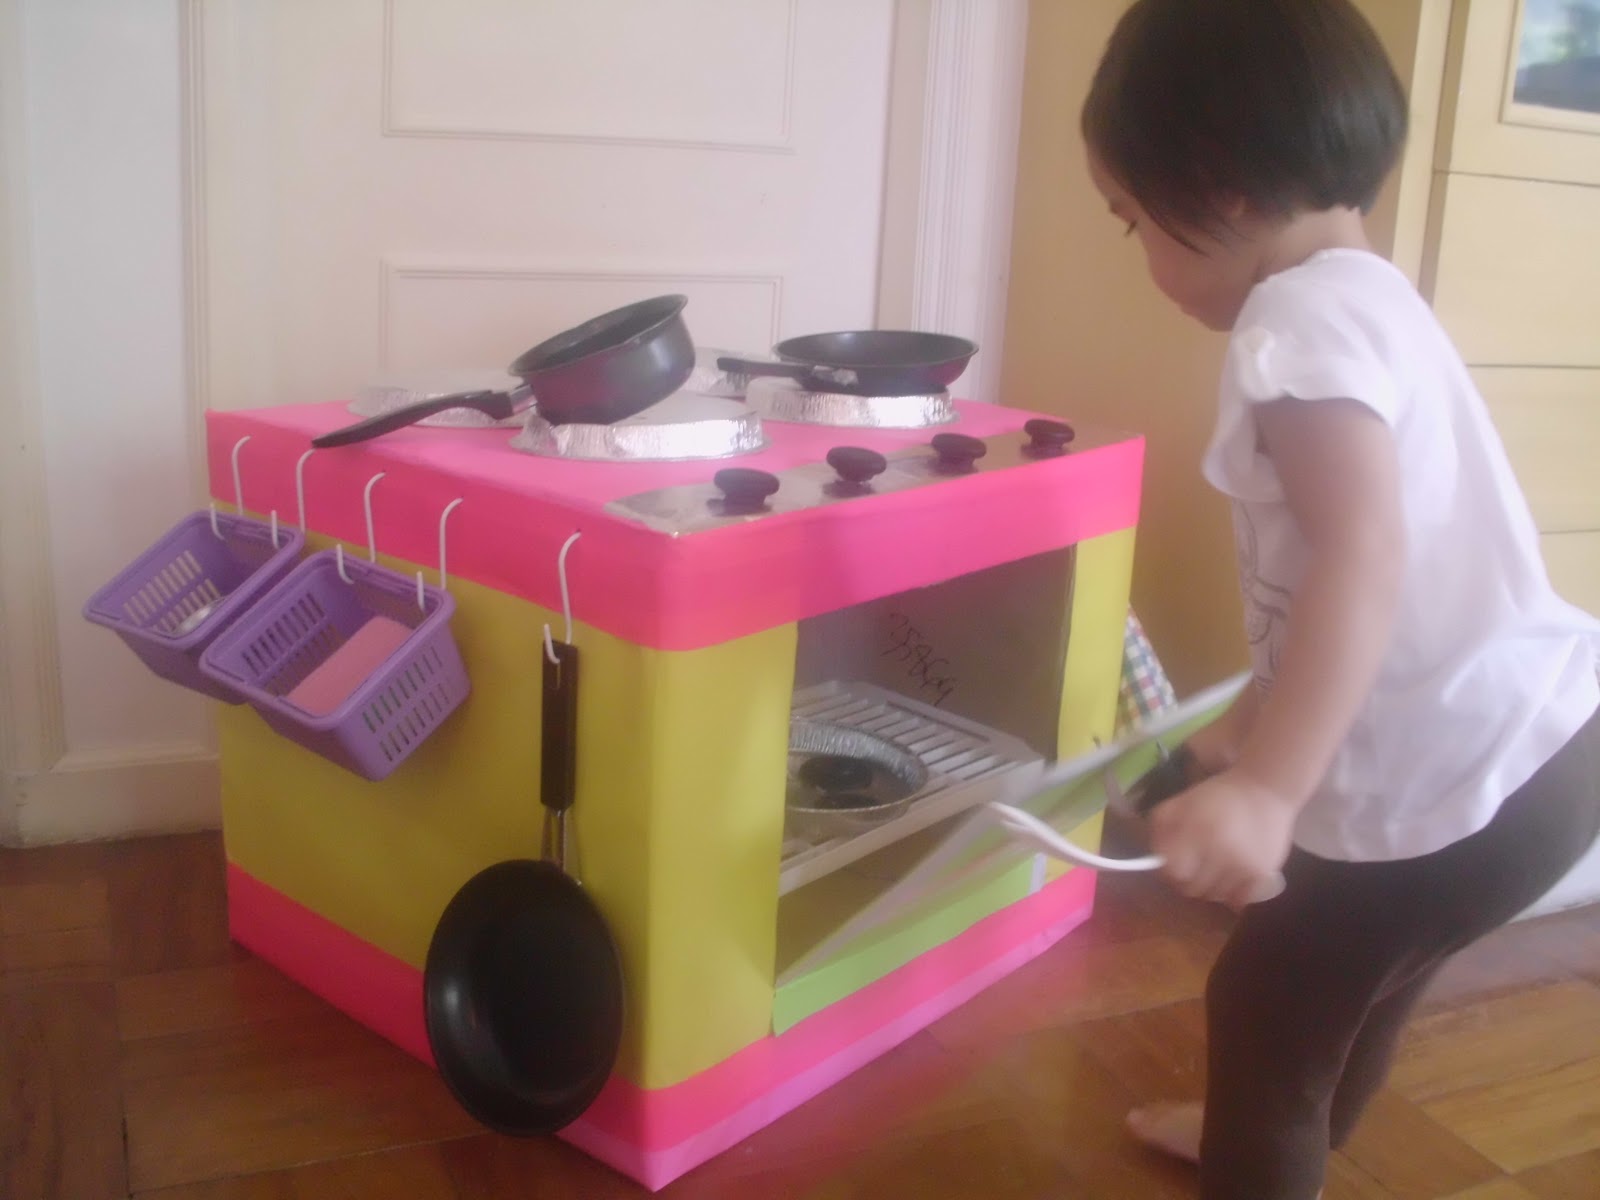
Homemade Toy Kitchen


Since my daughter Therese enjoys playing with toy kitchens, I thought I'd make one rather than buy the glammed-up, plastic kinds in the department stores.  The inspiration for this toy kitchen came from the book lent to us by my sister-in-law (Children's Rooms: Practical Design Solutions for Ages 0-10).

The book's version was nice and basic - made out of a brown box, silver packaging tape and black paper for the controls.  I wanted to make an exact copy but I thought I'd use the pink packaging tape I had on hand (from the pink flamingo mallets we made for Therese's "Alice" birthday party) and cover the slightly worn-out box with yellow, pink and green paper.    

Part of the fun in putting it together was sourcing all of the add-ons with my hubby - the pots, pans, cooking mitts, mini tongs, purple baskets, S-hooks, foil pans, etc. from the local grocery store, hardware store and Divisoria, the local market district in Manila!  I think we did a pretty good job! 

On S- hooks: Oven mitts, strainer, detachable purple basket with mini tongs, ladle and server  

Stovetop made out of foil pans (held in place by double-sided tape).  Controls are black kettle cover holders!  Underneath is one of my best finds - aluminum foil tape!

Detachable purple baskets holding sponges and mini plates.  


The "oven" is on one side of the box and on the opposite side is the "ref."  Inside the ref and oven are shelf racks to serve as the oven grill and ref shelving.


The purple baskets are detachable so they can serve as "shopping baskets" when Therese and her cousin Sophia "go to market."

I love that the girls keep busy playing with this kitchen set!   

Here's a photo of them "cooking" white beans!  


And Therese checking how the "doughnuts" are doing in the oven.


A rough guide to the oven and ref measurements.  Do adjust the measurements to the size of your box. : )


05 May 2011

Easter Craft Fun

We had so much fun during a family crafternoon session the day before Easter.  We had  many craft projects lined up, too bad there was so little time to do all.  

Just some of the activities we thought up in preparation for the Easter breakfast celebration:
1. Rabbit masks for the kids made out of foam sheets
2. Egg decorating
3. Mini paper baskets
4. Brown paper baskets

Before we knew it, the sun was setting and I only took a night shot of the dining room centerpiece.  Hope you enjoy them nevertheless.  

Rabbit masks made out of foam sheets. Copied this from an art project done in school!


 I stuck double-sided tape on the back side.  It works better than glue.
 I used a hole puncher to make tiny holes to put the garter in place.

Brown paper bag baskets.  Got this idea from the Martha Stewart website.  Check out Paper Basket Bouquet.  Martha's basket looks better of course!

Decorated the basket with foam stickers.


The other paper baskets were made out of pastel board paper. 

My pink and purple paper basket. (Behind it are the eggs waiting to be dyed!)


My mother-in-law studied the stencil and made a larger version of the paper basket.  Below is a photo of her creation.  Really cute.


I made out a stencil for efficiency.  Stencil for the mini paper baskets.


Voila!  The nightshot of the stuffed bunny centerpiece purchased by my mother-in-law surrounded by our little arts and crafts projects...I love the yellow paper basket my sister-in-law made.  Too bad this is my only photo of it...The table runner is made out of yellow-green felt paper.  My sister-in-law scattered foam stickers on the felt paper to make the effect of strewn flowers and insects on grass.  Lovely.


01 May 2011

Doodles Made into a Birthday Card

My two year old was busy one morning cutting and doodling circles that looked like gorgeous roses with different shades of yellow and red.  I thought I'd cut and paste them to make a card for my sister-in-law whose birthday was just around the corner.

I love that we made the card out of recycled paper.  My daughter doodled on a scratch paper that came from Daddy's office and the leaves and stems were from a piece of green paper I got from an old calendar.

The flowers were done with the Crayola Paint Markers, a treat from my brother-in-law who arrived from a US trip years ago.  I was pleasantly surprised to find that they had not dried up.  The tips of the paint markers are made out like a paintbrush so the doodles come out  like brush strokes!